由于最近xx大,因某云发的一封邮件,害得我把辛苦搭建的ss服务毁于一旦。由于实在是无聊,于是又重操旧业,重新搭了一遍,也算是温故知新了吧!
服务器环境
- 阿里云海外主机(可能会被GOV给和谐掉),速度嘛也还将就。操作系统CentOS 7.4
前端安装说明
安装lnmp
- lnmp下载地址 lnmp下载
- lnmp的安装请参照:lnmp安装, 请记住MySQL root密码^_^。
- 添加虚拟主机,请参照:添加、删除虚拟主机及伪静态管理, 这一步最好一步到位,在填写域名的时候,直接填写你要绑定服务器的域名,并创建数据库 后面会用到。
- lnmp相关软件目录及文件位置
lnmp我选用的版本为v4,lnmp的安装时长较长,请耐心等待,如担心因网络问题导致的远程连接中断,请考虑使用screen,这个在lnmp安装文档中有,就不啰嗦了。lnmp涵盖了pathinfo、伪静态、单独新建数据库、防跨目录设置open_basedir等操作,请耐心阅读相关文档,以便减少不必要的时间开支(查询资料真的好累,捂脸⊙﹏⊙‖∣)。
安装ss-panel
ss-panel源码下载地址:https://github.com/orvice/ss-panel/tree/v3,执行
cd /home/wwwroot/{your website}
git clone https://github.com/orvice/ss-panel.git tmp -b v3 && mv tmp/.git . && rm -rf tmp && git reset --hard
通过
composer安装程序组件curl -sS https://getcomposer.org/installer | php php composer.phar install进行网站的配置,主要是配置写权限,及目录访问限制的设置
cd /home/wwwroot/{your website}
chmod -R 777 storage
chattr -i .user.ini
mv .user.ini public/
cd public
chattr +i .user.ini
配置
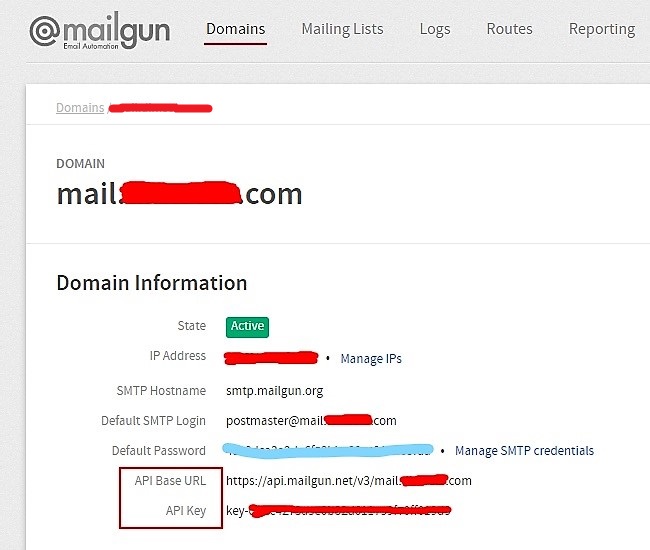
.env文件,执行cp .env.example .env, 重要配置如下:appName = 'ss-panel3' // 站点名称 baseUrl = 'https://www.google.com' // 站点地址 pwdMethod = 'sha256' // 密码加密方式 可选 md5,sha256 muKey = '' // mu key 用于校验ss-go mu的请求 mailDriver = 'mailgun' // mailgun邮件 # database 数据库配置 db_driver = 'mysql' db_host = 'localhost' db_port = '3306' db_database = 'sspanel' db_username = 'sspanel' db_password = 'sspanel' db_charset = 'utf8' db_collation = 'utf8_general_ci' db_prefix = '' # mailgun mailgun_key = '' // API KEY mailgun_domain = '' // API Base URL mailgun_sender = '' // mailgun注册时的用户名 通常为邮箱- 如图所示:

- 如图所示:
- 导入数据库脚本 将
db.sql导入到数据库中 配置nginx站点配置文件(
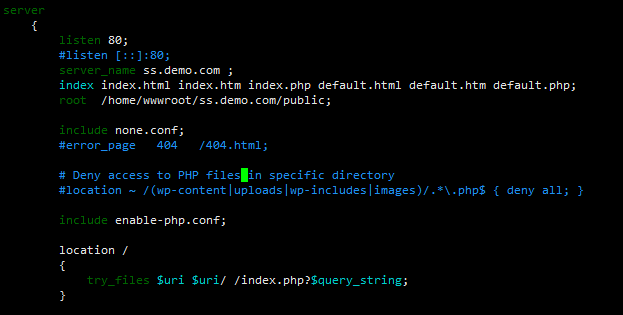
/usr/local/nginx/conf/vhost/{your website}.conf),配置nginx如下:location / { try_files $uri $uri/ /index.php?$query_string; }此处配置nginx的目的在于,由于使用
slim框架(和Laravel类似)进行开发,url请求为http://demo.com/auth/login而非pathinfo形式(pathinfo url为http://demo.com/index.php/auth/login)- 附图:

- 附图:
至此,前端已经基本配置完成了。现在访问一下站点,是否正常,如果正常恭喜你,出错了也不用着急,自己尝试着解决一下,首先看一下错误信息,sorry,错误信息不显示,请配置
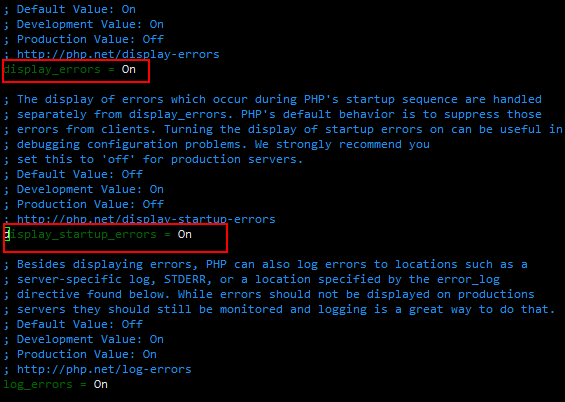
/usr/local/php/etc/php.ini文件(执行/etc/init.d/php-fpm restart使配置生效),配置如下:display_errors = On display_startup_errors = On附图:

如果遇到了下面的错误,请尝试将/usr/local/nginx/conf/fastcgi.conf文件中的fastcgi_param PHP_ADMIN_VALUE "open_basedir=$document_root/:/tmp/:/proc/";这一行给注释掉,然后执行service nginx restartWarning: require(): open_basedir restriction in effect. File(/home/wwwroot/ss.demo.com/bootstrap/app.php) is not within the allowed path(s): (/home/wwwroot/ss.demo.com/public/:/tmp/:/proc/) in /home/wwwroot/ss.demo.com/public/index.php on line 7
后端安装说明
后端使用shadowsocks-manyuser
安装
pip,并通过pip安装组件yum install m2crypto python-setuptools easy_install pip pip install cymysql下载
shadowsocks-manyuser源码git clone https://github.com/mengskysama/shadowsocks.git tmp -b manyuser && mv tmp/.git . && rm -rf tmp && git reset --hard配置
Config.py文件和config.json文件#Config MYSQL_HOST = 'mdss.mengsky.net' MYSQL_PORT = 3306 MYSQL_USER = 'ss' MYSQL_PASS = 'ss' MYSQL_DB = 'shadowsocks' MANAGE_PASS = 'ss233333333' #if you want manage in other server you should set this value to global ip MANAGE_BIND_IP = '127.0.0.1' #make sure this port is idle MANAGE_PORT = 23333{ "server":"0.0.0.0", "server_ipv6": "[::]", "server_port":8388, "local_address": "127.0.0.1", "local_port":1080, "password":"m", "timeout":300, "method":"aes-256-cfb" # 统一改为 aes-256-cfb 方式加密和ss-panel里保持一致 }- 运行服务,在
shadowsocks目录执行python server.py 安装进程管理工具
supervisor守护进程yum install supervisor5.1 添加ss配置
vim /etc/supervisord.d/shadowsocks.ini[program:shadowsocks] command=python /usr/local/shadowsocks/server.py -c /usr/local/shadowsocks/config.json autorestart=true user=root5.2 设置supervisor开机启动
systemctl enable supervisord
systemctl start supervisord
5.3 debug查看日志:
supervisorctl tail -f shadowsocks stderr5.4 启动/重启/停止
supervisorctl start/restart/stop shadowsocks
主要参考资料:
本文由 waynelone 创作,采用 知识共享署名4.0 国际许可协议进行许可。
本站文章除注明转载/出处外,均为本站原创或翻译,转载前请务必署名。
